The My Surveys Page is the default page shown after you log in to your SurveyMethods account.

You can also reach it from within the application by clicking “Surveys” on the main navigation bar or “My Surveys” on the “Surveys” dropdown.
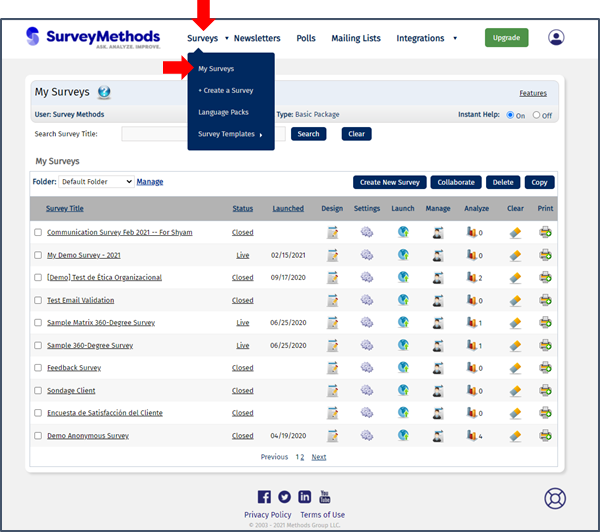
By default this page will show surveys contained in your “Default Folder”. You can change the folder using the “Folder” dropdown on the left side, and you can organize your surveys in your folders using the “Manage” link to the right of the folder dropdown.

The page will display your surveys in reverse chronological order based on when they were created, with the 10 most recent displaying on the page. You can navigate to a different page using the “Previous” and “Next” links or clicking on the page numbers.

You can also search for a survey using the search bar across the top.
To create a new survey, click the “Create New Survey” button. If you want to collaborate, delete, or copy a survey, select the box on the left side and click the desired action on the top.

You can sort the list within the folder by title, status or launched date by clicking on any of the three headings. These columns can be sorted in ascending or descending order.

Event surveys and collaborated surveys will be denoted with either the event icon () or the collaboration icon (
) (or both, if an event survey is collaborated).

You can see the survey title, status (Live vs. Closed) and launched date (if applicable) in the next three columns. To the right of that there are 7 actions you can perform:
Design or edit your survey, including adding or editing questions, inserting or managing page logic, modifying page layout and order, adding a logo, updating your survey style, etc.
Access the survey settings. This allows you to manage the survey general properties (title, language pack, etc), navigation and numbering properties, survey attempt settings, communication properties, set quotas or the survey close date/time, manage calendar events, and more.
Launch your survey using web URL or email deployment.
Manage your survey after launch, including viewing real-time response statistics, sending reminders, embedding your survey on your website or distributing via social media, sending the survey to additional respondents, and more.
[x] Survey analysis menu. The number next to this icon denotes the number of responses (complete and partial) received so far for your survey. Clicking on the icon takes you to the survey analysis menu where you can view or modify Basic reports (Individual Results report and Results Summary) or Professional reports (Quick Report Generator and Custom Report Builder).
Clear your survey responses. Note this permanently deletes the responses.
Print a copy of your survey or export to Word or PDF.
At the bottom of the page you can visit our Facebook, Twitter, LinkedIn or YouTube pages or view our Privacy Policy and Terms of Use.
On the bottom right you can click the Lifebuoy icon () to contact our support team or submit a ticket.